

Compared to other synths Serum offers nearly endless possibilities. It comes with plenty of features and chances are good that, unless you’re an absolute sound design nerd, you don’t know about all of them.. but don’t worry, I’m here to help out.
Before we’re getting started I just want to let you know about one thing: I’m using a MacBook so there are a few spots in this spot where I’m mentioning this weird “Command” key. If you’re a Windows user just imagine it says “Ctrl” and all short cuts should work fine.
Here are 27 Serum tips and tricks. Let’s go!
Change All LFO Curves At Once

One of my favorite Serum tricks is that you can change all LFO curves at once. Try to hold “alt” the next time you’re changing a curve and you’ll notice that you have control over all of them at once.
Copy LFOs & Envelopes
If you want to copy one envelope or LFO to another one you can easily do so by holding alt. Now click for example on “LFO 1” and drag it to “LFO 2”. That’s it. Cool, right?
Looping Just A Part Of An LFO

If you’re running an LFO in envelope mode you still have the possibility to loop a specific part. Just hold Shift + Command + click on a point of your choice. Now the envelope will start at the beginning as usually, but will loop from the new loop point on. In order to delete a loop point right-click it and select “Remove Loopback point”.
Move Multiple LFO Points At Once
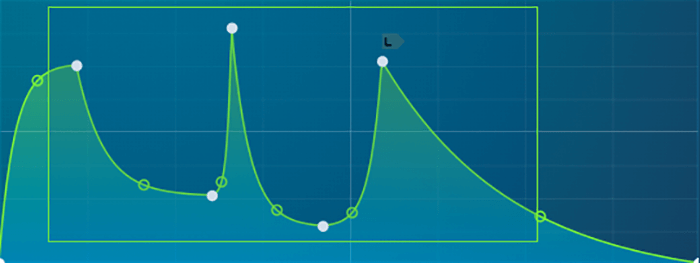
In order to move more than one LFO point at once, just select multiple points, click on one of them and drag it somewhere.
Flip LFOs
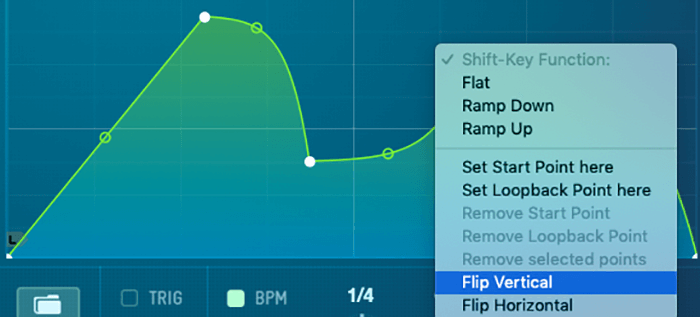
Just made the perfect LFO shape, but then noticed it should be the other way around to make sense? Right-click on the LFO graph and select either “Flip Vertical” or “Flip Horizontal”.
Starting LFOs From Any Point
Just like you can set a loop point you can also set a specific start point. I don’t know if there’s a shortcut, but you can right-click any point and select “Set Start Point here”.
Draw LFO Steps

In order to draw LFO steps, just like you’d do with a step sequencer you can hold “shift” while clicking anywhere. In order to increase or decrease every step’s size you can adjust the grid size in the bottom-left corner.
Change the Shift-Key Function
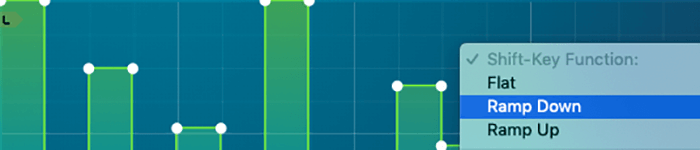
Instead of drawing a flat line while holding “Shift” you can change it up to either be a ramp up or down. Just right-click on the LFO graph and select “Ramp Down” or “Ramp Up”.
Unsync LFOs
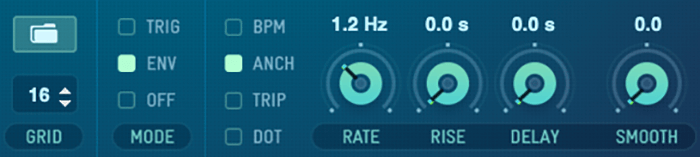
Your LFOs are usually synced to the BPM of your DAW. You can, however, turn this option off by clicking on “BPM”. Now the rate will be displayed in Hz, which is especially useful if you’re using the LFO in envelope mode and want it to sound exactly the same, no matter which tempo your DAW is currently set to.
Custom Skins
This Serum tip won’t help you to step up your sound design game, but it can help you to have more fun working on your music. So if you’d like to switch up your skin to make it look a bit different just click on the logo in the top-left corner, hover over “Skin” and select “Promethium”. If you’d like to install some additional skins by independent designers make sure to check out this post.
Create Arps
Unfortunately Serum doesn’t have an arp.. or, at least not in the way we know arps from other synths. Since it, however, comes with the craziest LFO you’ve ever seen you can simply create your own one. Here’s how:

First you need to make sure that the sustain of envelope 1 is all the way up so the volume doesn’t decrease while holding a note. Now in order to make the preset sound like there are multiple notes getting triggered over and over again you have to draw a ramp down in LFO 1 and attach it to either the volume of your oscillator(s) or the filter’s cutoff. To make the arp play a different note every time LFO 1 loops, map LFO 2 to SEM and draw in different steps, while holding shift.
Change Modulation Depth
If you want to change the modulation depth you probably click on the little headphone icon or change it in the matrix, right? There’s, however, another way: try to hold alt while clicking on any modulated parameter the next time. This way you don’t have to hit the headphone icon, which is especially useful if your trackpad or mouse speed is set to fast.
Decrease The Width

If you run an oscillator with unison Serum is usually extremely wide, which can lead to problems with your mono compatibility. In order to decrease the width just go to the global tab. Alternatively you can run your patch without unison and make it wider using external plugins, such as iZotope’s free Ozone Imager or Polysonic’s Wider plugin.
Trigger Serum FX via MIDI
You’re using another synth or loop, but you’d like to use Serum’s effect section anyway? The VSTi comes with an additional plugin, called “Serum FX”, which can be inserted as an effect instead of an instrument. To trigger notes, envelopes or LFOs you can simply select a MIDI source in your DAW.
Make Wavetables From Pictures
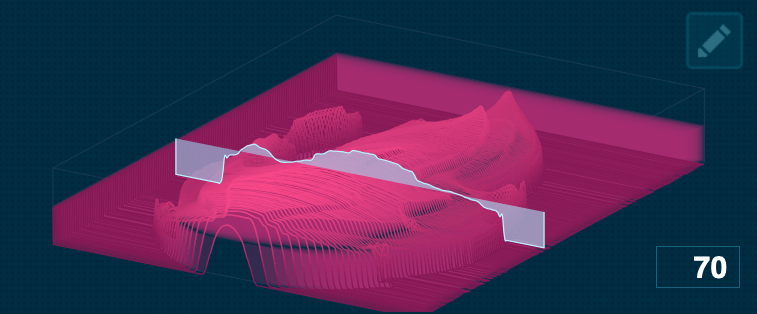
Want to create a wavetable from any picture? Just make sure it’s in .png format and drag it into one of the oscillators. Serum will automatically transfer it into a wavetable.
Render & Resample
Want to use endless warp modes and wavetables at once? No problem! Just use the render and resample functions. “Render” renders the warp mode you’ve applied to an oscillator, so you can apply another one. “Resample” is quite similar, but instead of just rendering the warp mode it resamples the entire output signal as a new wavetable. You’ll find both options in the menu.
Hidden Mod Sources
Serum comes with a variety of different modulation sources. Some of them are obvious and some are rather hidden. In order to show all right-click on a parameter of your choice. Hover over “Mod Source” and a menu with all possible sources will appear. Some of my favorite ones are Chaos and NoteOn Rand, because they allow you to randomize your preset.
Use The Noise OSC As A Sampler
If Serum has a weak point it’s probably that it doesn’t come with a complete sampler unit. You can, however, drag any sample into the noise OSC. Enable the “One Shot mode” so it doesn’t repeat, adjust the pitch and if necessary the fine tuning (you’ll find it in the top-right of the global tab). If you combine some one shot samples with synthesize you can get some interesting results.
Display The Filter’s Phase
If you’d like to know what the filter does to your phase just click on the graph. I honestly don’t know how this can be useful, but some audio experts might find it interesting.
Flip Parameters

There are some Serum effects that allow you to flip certain parameters. You can, for example, flip the filter’s mix knob to control the level. This is especially useful if you’re using the filter drive. Another parameter that can be flipped is the chorus filter. It’s either a low- or a high-pass.
The Global Tab
Well, the global tab isn’t really a trick, but I wanted to include it in this list anyway. A lot of producers overlook it, although there are some incredible options. You can, for example, change the detuning range, increase the unison width or adjust the preferences to fit your personal workflow.
Modulation Types

Serum comes with 2 different modulation types: unipolar and bipolar. In order to switch them you can either click on the type in the matrix or just “Shift + Alt + Click” on any modulated parameter.
Modulation Aux Source
One of the features I love the most about Serum is that it allows you to further modulate any modulation. You can either right-click any modulated parameter or just go to the matrix to select an aux source. If you pick macros as aux sources you can control the modulation depths directly from the front end.
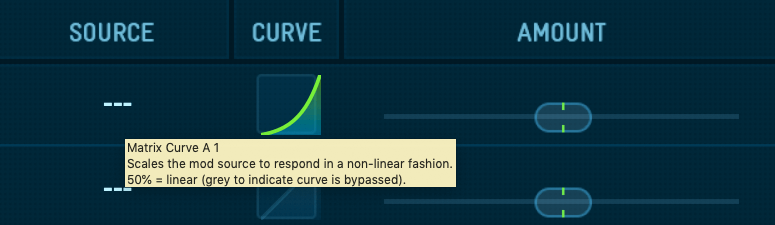
Modulation Curve

Another feature most producers and sound designers overlook are the modulation curves. It’s really rare that I see them being used in presets from other sound design labels, although they can be pretty handy. In order to access them go to the matrix. You’ll find a curve for every single modulation and aux source.
Disable The Effect Rate
Most modulation effects like phasers or flangers have a rate that can often be changed, but never set to 0. With Serum it’s different. You can set the rate of all of those effects to 0, which depending on the effect you’ve picked results in something similar to flange and phase filters. To take this a step further you can modulate the other parameters like depth, phase or feedback, so you have full control over the rate and LFO curve.
Tool Tips
You’re new to Serum and don’t know what all of the parameters are doing? Hovering with your mouse will show a pop-up, which explains you in a short sentence what this parameter exactly does.
The Most Complete Serum Guide Ever
If you search for Serum tips on YouTube you’ll often find videos made by producers who aren’t actually that experienced, so if you’d really like to study this synth in depth you should definitely take a look at the user manual. Yes, it seems boring compared to watching YouTube videos, but it’s simply the most comprehensive guide you’ll find. Go to the menu and click on “Read the manual”. I’d recommend checking it out once in a while, because you probably won’t remember everything after reading it for the first time.
Conclusion
As you can see, Serum has (especially compared to other synths) tons of features that can help you to achieve nearly every sound, so you literally don’t need any other synth. Now open your DAW and try out some of the tips and tricks of this post.. but before you go, check out these Mellotron presets (they’re free).